Zones
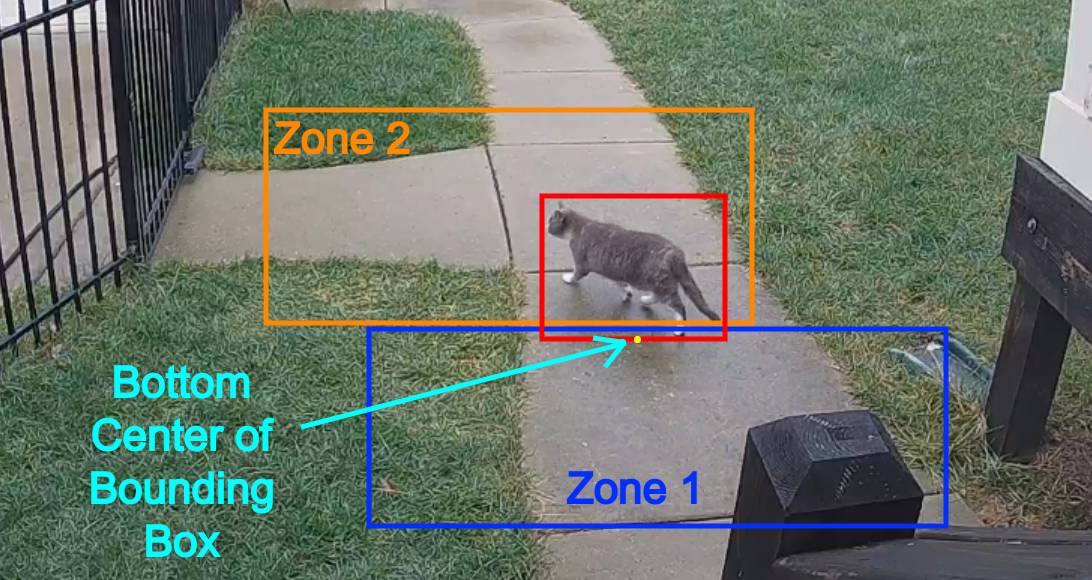
Zones allow you to define a specific area of the frame and apply additional filters for object types so you can determine whether or not an object is within a particular area. Presence in a zone is evaluated based on the bottom center of the bounding box for the object. It does not matter how much of the bounding box overlaps with the zone.
For example, the cat in this image is currently in Zone 1, but not Zone 2.
Zones cannot have the same name as a camera. If desired, a single zone can include multiple cameras if you have multiple cameras covering the same area by configuring zones with the same name for each camera.
During testing, enable the Zones option for the Debug view of your camera (Settings --> Debug) so you can adjust as needed. The zone line will increase in thickness when any object enters the zone.
To create a zone, follow the steps for a "Motion mask", but use the section of the web UI for creating a zone instead.
Restricting alerts and detections to specific zones
Often you will only want alerts to be created when an object enters areas of interest. This is done using zones along with setting required_zones. Let's say you only want to have an alert created when an object enters your entire_yard zone, the config would be:
cameras:
  name_of_your_camera:
    review:
      alerts:
        required_zones:
          - entire_yard
    zones:
      entire_yard:
        coordinates: ...
You may also want to filter detections to only be created when an object enters a secondary area of interest. This is done using zones along with setting required_zones. Let's say you want alerts when an object enters the inner area of the yard but detections when an object enters the edge of the yard, the config would be
cameras:
  name_of_your_camera:
    review:
      alerts:
        required_zones:
          - inner_yard
      detections:
        required_zones:
          - edge_yard
    zones:
      edge_yard:
        coordinates: ...
      inner_yard:
        coordinates: ...
Restricting snapshots to specific zones
cameras:
  name_of_your_camera:
    snapshots:
      required_zones:
        - entire_yard
    zones:
      entire_yard:
        coordinates: ...
Restricting zones to specific objects
Sometimes you want to limit a zone to specific object types to have more granular control of when alerts, detections, and snapshots are saved. The following example will limit one zone to person objects and the other to cars.
cameras:
  name_of_your_camera:
    zones:
      entire_yard:
        coordinates: ... (everywhere you want a person)
        objects:
          - person
      front_yard_street:
        coordinates: ... (just the street)
        objects:
          - car
Only car objects can trigger the front_yard_street zone and only person can trigger the entire_yard. Objects will be tracked for any person that enter anywhere in the yard, and for cars only if they enter the street.
Zone Loitering
Sometimes objects are expected to be passing through a zone, but an object loitering in an area is unexpected. Zones can be configured to have a minimum loitering time before the object will be considered in the zone.
cameras:
  name_of_your_camera:
    zones:
      sidewalk:
        loitering_time: 4 # unit is in seconds
        objects:
          - person
Zone Inertia
Sometimes an objects bounding box may be slightly incorrect and the bottom center of the bounding box is inside the zone while the object is not actually in the zone. Zone inertia helps guard against this by requiring an object's bounding box to be within the zone for multiple consecutive frames. This value can be configured:
cameras:
  name_of_your_camera:
    zones:
      front_yard:
        inertia: 3
        objects:
          - person
There may also be cases where you expect an object to quickly enter and exit a zone, like when a car is pulling into the driveway, and you may want to have the object be considered present in the zone immediately:
cameras:
  name_of_your_camera:
    zones:
      driveway_entrance:
        inertia: 1
        objects:
          - car
Speed Estimation
Frigate can be configured to estimate the speed of objects moving through a zone. This works by combining data from Frigate's object tracker and "real world" distance measurements of the edges of the zone. The recommended use case for this feature is to track the speed of vehicles on a road as they move through the zone.
Your zone must be defined with exactly 4 points and should be aligned to the ground where objects are moving.
Speed estimation requires a minimum number of frames for your object to be tracked before a valid estimate can be calculated, so create your zone away from places where objects enter and exit for the best results. Your zone should not take up the full frame. An object's speed is tracked while it is in the zone and then saved to Frigate's database.
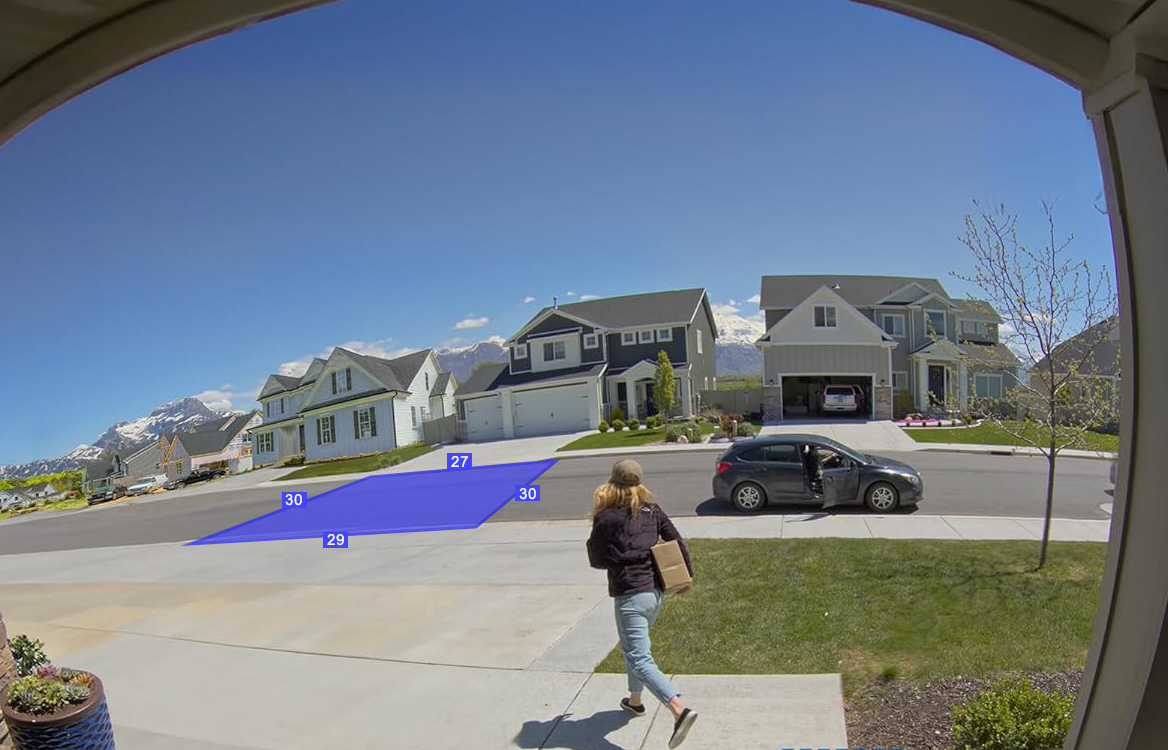
Accurate real-world distance measurements are required to estimate speeds. These distances can be specified in your zone config through the distances field.
cameras:
  name_of_your_camera:
    zones:
      street:
        coordinates: 0.033,0.306,0.324,0.138,0.439,0.185,0.042,0.428
        distances: 10,12,11,13.5 # in meters or feet
Each number in the distance field represents the real-world distance between the points in the coordinates list. So in the example above, the distance between the first two points ([0.033,0.306] and [0.324,0.138]) is 10. The distance between the second and third set of points ([0.324,0.138] and [0.439,0.185]) is 12, and so on. The fastest and most accurate way to configure this is through the Zone Editor in the Frigate UI.
The distance values are measured in meters (metric) or feet (imperial), depending on how unit_system is configured in your ui config:
ui:
  # can be "metric" or "imperial", default is metric
  unit_system: metric
The average speed of your object as it moved through your zone is saved in Frigate's database and can be seen in the UI in the Tracked Object Details pane in Explore. Current estimated speed can also be seen on the debug view as the third value in the object label (see the caveats below). Current estimated speed, average estimated speed, and velocity angle (the angle of the direction the object is moving relative to the frame) of tracked objects is also sent through the events MQTT topic. See the MQTT docs.
These speed values are output as a number in miles per hour (mph) or kilometers per hour (kph). For miles per hour, set unit_system to imperial. For kilometers per hour, set unit_system to metric.
Best practices and caveats
- Speed estimation works best with a straight road or path when your object travels in a straight line across that path. Avoid creating your zone near intersections or anywhere that objects would make a turn. If the bounding box changes shape (either because the object made a turn or became partially obscured, for example), speed estimation will not be accurate.
- Create a zone where the bottom center of your object's bounding box travels directly through it and does not become obscured at any time. See the photo example above.
- Depending on the size and location of your zone, you may want to decrease the zone's
inertiavalue from the default of 3. - The more accurate your real-world dimensions can be measured, the more accurate speed estimation will be. However, due to the way Frigate's tracking algorithm works, you may need to tweak the real-world distance values so that estimated speeds better match real-world speeds.
- Once an object leaves the zone, speed accuracy will likely decrease due to perspective distortion and misalignment with the calibrated area. Therefore, speed values will show as a zero through MQTT and will not be visible on the debug view when an object is outside of a speed tracking zone.
- The speeds are only an estimation and are highly dependent on camera position, zone points, and real-world measurements. This feature should not be used for law enforcement.
Speed Threshold
Zones can be configured with a minimum speed requirement, meaning an object must be moving at or above this speed to be considered inside the zone. Zone distances must be defined as described above.
cameras:
  name_of_your_camera:
    zones:
      sidewalk:
        coordinates: ...
        distances: ...
        inertia: 1
        speed_threshold: 20 # unit is in kph or mph, depending on how unit_system is set (see above)